


By Logan Wood
All images © Logan Wood
If you’re like the Ikelite team, you find yourself in some of the most beautiful waters on Earth. Whether it's the warm weather of the tropics or the frigid waters of the arctic, you’re surrounded by the natural beauty of our world. Commonly these remote locations that underwater photographers travel to are also separated from light pollution of the mainland, and often islands don’t have much night life apart from the night diving.
One of my favorite subjects to shoot is the night sky. Contrary to the daytime, it’s quiet and cold, and the process of taking a photo is much slower. Typically, your shutter speed is going to range from 15-30 seconds, and as you’ll read below, lunar photography can require many exposures. I can almost drift into a meditative flow between focusing on the composition and waiting to see the result. However, recently I’ve been looking for a new challenge. Something in night sky photography that goes beyond a single shutter release.
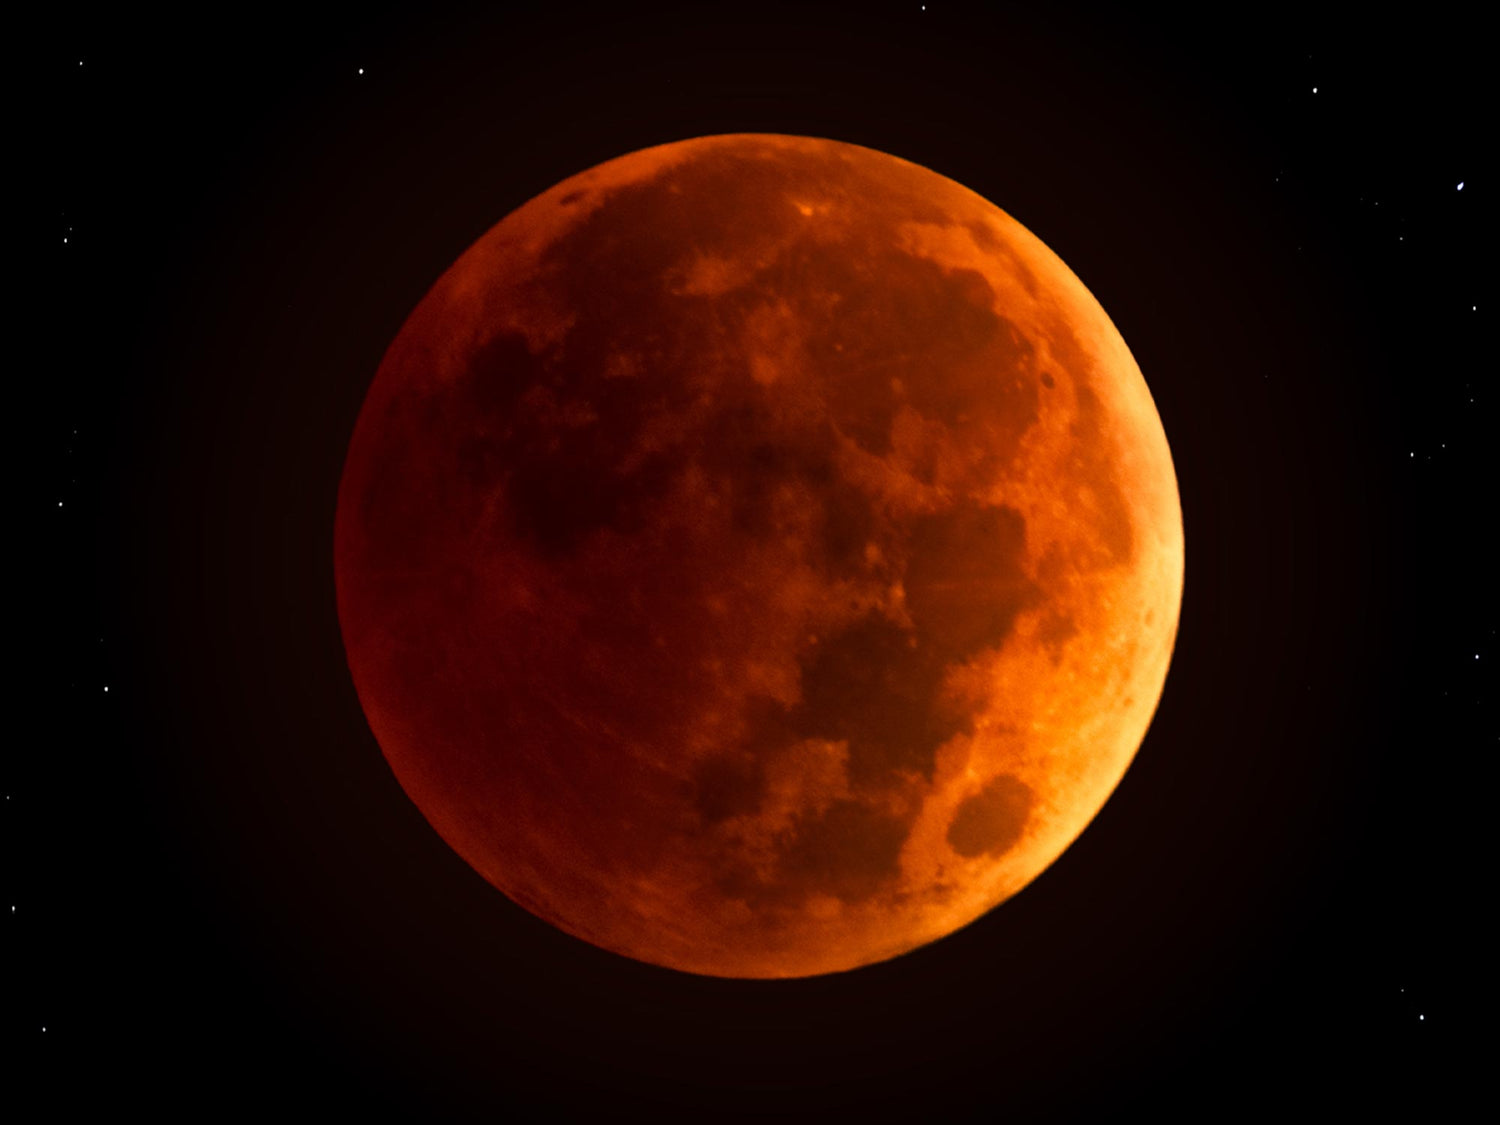
The first stop on this journey is lunar photography. Photographing The Moon goes beyond a single shutter release because of how much post processing you can do. I decided to dive head-first into this challenge by photographing the last lunar eclipse of 2022 (and until 2025). A lunar eclipse is when the Earth is lined up directly between the Sun and the Moon. The shadow of the Earth is what causes the eclipse and sometimes a red glow on the moon. In this article, I’ll take you through how I created the image below. From the gear I used, my camera settings, and post-processing.
Gear

Tripod
The first piece of gear in my setup is a tripod. It is almost mandatory that you shoot on a tripod for any night photography because slow shutter speeds require no movement to capture a sharp scene. In my case, I was shooting on the Peak Design Travel Tripod. This is the best tripod I have used, it’s light, easy to move around with, and steady. However in hindsight, for lunar photography, I think having something with a more traditional ball head would have been better. Keep reading to see why.
Lens
To our naked eyes, the moon appears decently sized in the sky, especially during the full moon. But as you’ve probably seen before, it comes out very small when shot through a wide lens, or even your iPhone. For this reason, you’ll need an extreme telephoto lens to zoom in very close to the moon. For this shoot, I rented a Sigma 150mm-600mm f5.6-6.3 lens from my local camera store, Robert’s Camera, in Indianapolis. This lens is no joke. At 10.5 inches in length, it's the biggest lens I’ve ever shot on and feels like it too. If you’re traveling light, I would suggest shooting at least 200mm. I recently traveled with the latest Sony 70-200mm GM lens and was surprised at how compact it was. I said above that I would’ve picked a tripod with a traditional ball head, because I kept feeling that the lens was weighing on the tightening mechanism of the tripod, causing movement.
Camera
In this situation, the camera is the least important piece of gear. When researching how to shoot lunar photography I read so many articles about what setup is the best, specifically camera. I couldn’t decide whether I should favor the low light benefits of full frame or the 1.5x crop factor of an APS-C camera. So, I took both, the top of the line Sony Alpha A1 and the Sony Alpha A6600. This way I could see if there was a difference between the two. You can see the difference between the two below. The image quality between the two is negligible. In fact, once cropped in post processing, both images become 1.84MP images.


Getting the Shot
So you’ve got your camera, tripod, and lens. Now it’s time to get the shot. One of the most useful apps I have found for planning any type of photo shoot is PhotoPills. PhotoPills has information, calculations, and an augmented-reality overlay for everything under the sun, literally. The night before, I simply dropped a pin at my location, loaded the date of the eclipse, and PhotoPills gave me the exact time and placement of every phase of the eclipse. I even walked outside, and using the augmented-reality overlay, saw exactly where in the sky the moon will be.
Pro tip: setting up your gear the night before makes the morning a bit easier.

I’ve calculated that the total eclipse is going to start at 6:00 am. So, I drag myself out of bed, make some coffee, and post up in front of my house with a clear view of the moon. Thankfully, from here things are pretty simple:
2. Settings (this is just a good starting point, experiment to see what exposure works for you).
- Shutter: 1sec
- Aperture: f/6.3
- ISO: 800
3. Zoom into the moon (or whatever your composition is).
4. Let your camera focus on the moon. It’s pretty bright and should stick onto the big glowing disc in the sky easily. If not, switch to manual and try to lock on yourself.
That’s it! Take about 5-10 exposures with the same settings, moving the camera to keep the moon in the frame. We will stack these photos later in Photoshop to reduce some of the noise from the high ISOs.
Post Processing
Adobe Lightroom

First, import your images into Adobe Lightroom. For my sanity, I organize my photos into collections so I’m only looking at my selected set of photos. Select the first photo, and under the “Lens Correction” tab, tick the “Remove Chromatic Aberration” and “Enable Profile Corrections”. Lightroom should automatically load your lens’ profile from the photo’s metadata, but if it doesn’t you can select it manually from the drop-down lists.
The next step is to crop your image into a 1x1 aspect ratio. Don’t worry, this does not have to be your final crop, the square aspect will help tremendously with stacking later. Make sure to crop in as close to the moon as possible (I tried stacking with a wider crop and failed every time due to all the negative space).

Next, you need to sync these edits with the rest of your images. This is done by selecting all of your images and hitting the “Sync” button in the lower right corner of your screen. By default, everything will be selected, but you only need to sync “Lens Correction” and “Crop”. Now readjust all of your images so that they are positioned in the middle of the square. In the end, they should all look the same.

Alright, the last step in Lightroom is to select all of your images > right click > “Edit in” > “Open as Layers in Photoshop…”
It’s important not to click “Edit in Adobe Photoshop” because that will open each image in separate documents. We want to open each image as a separate layer within the same document.

Adobe Photoshop
Cool, now you’re in Adobe Photoshop, and you can see all your images as layers on the right side of the window. Select all of the images and go to “Edit” > “Auto-Align Layers…”. When prompted to choose a method of projection, choose “Auto”. If done correctly your images should automatically align. If you run into an error, it’s probably because you didn’t crop close enough to the moon. Go back to Adobe Lightroom, readjust your crop on all your images, and import them back into Adobe Photoshop.
Assuming you got through the alignment step, now it’s time to convert your layer to a Smart Object. Go to “Layer” > “Smart Objects” > “Convert to Smart Object”. You’ll see a small icon appear on top of your layer, which means it has been converted to a Smart Object. Next, go to “Layer” > “Smart Object” > “Stack Mode” > “Median”. This with stack and images and remove some of the noise from high ISOs. You can see the difference it makes in the comparison below.

Congratulations, you’ve stacked your moon photo! Now let’s expand the canvas size to resize your photo. Go to “Image” > “Canvas Size…”. Here you can choose what aspect ratio you’d like your image to be. Below are a few of the popular aspect ratios for sharing online:
- Square - 1080px x 1080px
- Portrait - 1080px x 1350px
- Landscape - 1080px x 608px
For this tutorial, I chose the 4x5 aspect ratio of 1350px x 1080px. After your canvas is resized, highlight your image and press command + T (control + T on windows), and readjust the size and position of the moon to the center. Next, you’ll want to fill in the negative space. Add a new layer by clicking the plus button in the bottom right corner, and the place is below all of your layers. Next sample your sky’s color with the eye dropper tool. With the new empty layer selected go to “Edit” > “Fill…” > “Foreground Color”. This will fill your empty layer with the same color as your sky.
Use this Image Stacking video to follow along as you edit your photos, or save it for future reference:
Lunar Photography - Image Stacking in Photoshop from Ikelite on Vimeo.
Extras
You could stop there with your newly stacked moon photo, or there are a couple of extra steps to liven up your photo. I happened to capture a few bright stars in a couple of my initial exposures. I chose to mask and blend that exposure with the “Pin Light” blending mode to add a few stars. This separates the moon from the sky a bit. I also added a faint glow to my moon by duplicating the moon layer, double-clicking the layer, checking “Outer Glow” and setting the opacity to “4”.
There you go! I hope this tutorial helped you bring your moon photos to life. Lunar photography is a great way to get out and photograph the night sky when the stars aren’t as bright.
Logan Wood, Video Editor for Ikelite, has been exploring the world around him and developing his passion for storytelling ever since he picked up a camera in High School. Originally from Indiana, he attributes his yearning for exploration to his early years, living and traveling in Europe. The inspiration he gains from the outdoors has lead him from working as a photographer in the mountains of Yosemite National Park to fully immersing himself in the underwater world of scuba diving. When not in the studio, Logan can be found cruising on his bike, going to concerts, or researching where to go next.
Additional Reading
Water Vlogged | Not-so-Great Lakes Surfing
Shooting a Surf Documentary in the Great Lakes with Matt Wagner [VIDEO]
Diving and Visiting Catalina Island [VIDEO]
Top 5 New Features in Adobe Lightroom with Kristina Sherk
Expand Your Tonal Range with HDR Photography
Underwater Photo Editing: Trash to Treasure Using Lightroom [VIDEO]